 |
Friday, March 14, 2014
Wednesday, February 12, 2014
Night Skylines

Ethan chose 6 buildings to illustrate in his skyline. From left to right he drew the Petronas Twin Towers in Kuala Lumpur, Malaysia,
CN Tower, Toronto, Canada,
Basilica of the Sagrada, Barcelona, Spain,
Leaning Tower of Pisa, Pisa, Italy,
Eiffel Tower, Paris, France,
Space Needle, Seattle, Washington, USA.

Tristan chose 5 buildings to illustrate in his skyline,
Petronas Twin Towers in Kuala Lumpur, Malaysia,
Space Needle, Seattle, Washington, USA.
Eiffel Tower, Paris, France,
The Great Pyramid of Giza, Egypt
CN Tower, Toronto, Canada.


Petronas Twin Towers in Kuala Lumpur, Malaysia,
CN Tower, Toronto, Canada,
Basilica of the Sagrada, Barcelona, Spain,
Leaning Tower of Pisa, Pisa, Italy,
Eiffel Tower, Paris, France,
Space Needle, Seattle, Washington, USA.

Petronas Twin Towers in Kuala Lumpur, Malaysia,
Space Needle, Seattle, Washington, USA.
Eiffel Tower, Paris, France,
The Great Pyramid of Giza, Egypt
CN Tower, Toronto, Canada.
Monday, December 2, 2013
Le vitrail/Stained Glass
Le vitrail est une composition décorative
formée de pièces de verre.
Louis Comfort Tiffany est un artist américain célèbre
pour ses oeuvres en verre teinté
dans le style Art nouveau.
Il est né le 18 février 1848 à New York et
il est décédé le 17 janvier 1933 à New York.
Aujourd'hui, nous allons faire un projet avec du papier tissu pour illustrer les sapins de Noël.
Clique sur le vitrail, puis les sapins, pour trouver le projet.
Avant commencer le papier pour le vitrail il faut décider-
Quelles couleurs? Choisissez les couleurs pour une raison.
 |
Puis avant découper les sapins il faut décider-
Combien de sapins? Choisissez un nombre impair.
Quelle grandeur? Pareil ou pas pareil?
Finalement, avant coller il faut planifier-
Où est-ce vous voulez les placer? Partout, ensemble, dans une ligne...............?
 |
  |
Thursday, November 28, 2013
Pop Art/Graphic Novels
What is Pop Art?
Pop Art is a form of art that depicts objects or scenes from everyday life and uses techniques of commercial art and popular illustration. It emerged in the mid-1950s in Britain and in the late 1950s in the United States.
One of the most notable pop artists
was Andy Warhol (1928-1987).
Another notable pop artist was
Roy Lichtenstein (1923-1997).
Take a mini-tour of the Stedelijk Museum (click on the play symbol)in Amsterdam, Netherlands. This museum is an international museum dedicated to modern and contemporary art and design.
Click Stedelijk to visit the online museum site.
Click pop art to see some pop art images.
Click comics to see an art idea.
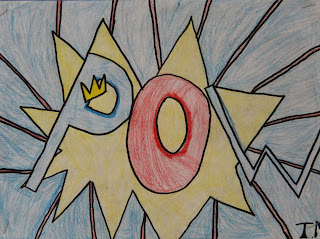
To Make a Word Pop for a Graphic Novel
POWER VAROOM POP BANG SPLAT
WOW STOP WHAM ZAP POW
Print the word artfully.
Create a detailed "bubble or frame" around it. The bubble or frame might be soft like a cloud with curved lines or sharp like an explosion with short straight lines.
Add other meaningful details if you like.
Choose primary colors to complete your "word".
"Pop Art"
From Madame Cann's Class


"Pop Art"
From Madame Cann's Class


Tuesday, November 5, 2013
Les poinsettias
 |
| Tacheté de Monet aquarelle Carole Villeneuve |
Georgia O'Keeffe (clique Georgia O'Keeffe)
Georgia O'Keeffe est née en 1887 à Wisconsin aux Etats-Unis. O'Keefe est connu pour peinturer de près les très grandes fleurs.
Voici quelques fleurs que Madame a vu près de San Diego dans les champs des fleurs à Carlsbad.
 |
| Ces pointsettias s'appellent "Eckespoint Monet". Ils sont nommé après l'artiste Claude Monet. |

Voici les fleurs qui s'appelle les "Ranunculus". Dans les champs de Carlsbad (clique les champs de Carlsbad) il y a les champs plein de ses fleurs de toutes les couleurs.

 After sketching a pointsettia on watercolour paper taped to a board, Oma traced it with oil pastel then painted it in 6 simple steps.
1. Paint the middle with water.
2. Paint the middle with yellow, green and purple.
3. Salt the middle.
4. Paint a bract (petal) with water.
5. Paint the bract with red leaving some white.
6. Repeat 4 and 5 with all bracts.
 When the pointsettia was dry Oma took off the tape and folded the card.

Here is a simple watercolour and pastel pointsettia that makes a wonderful card, a beginner project that can be completed easily in an afternoon.

1. Paint the middle with water.
2. Paint the middle with yellow, green and purple.
3. Salt the middle.
4. Paint a bract (petal) with water.
5. Paint the bract with red leaving some white.
6. Repeat 4 and 5 with all bracts.

Wednesday, October 30, 2013
Happy Halloween/Joyeuse Halloween
 |
| Madame a sculpté les citrouilles de son jardin. Elles sont les feux follets maintenant. Elles s'appellent Giggles et Chuckles. |
Saturday, October 5, 2013

Wednesday, May 29, 2013
Owen and Mzee
Mr. Mason's grade ones painted
Owen and Mzee
using watercolour paint, acrylic paint
and pastels.
 |
Sunday, May 12, 2013
Covered Bridges
Mrs. Moore's grade five class painted Covered Bridges, using watercolour and pastel,
as part of their study of Canada.

In 1900, Quebec, New Brunswick and Ontario had an estimated
1000, 400 and five covered bridges respectively.
By the 1990's there were 98 in Quebec, 62 in New Brunswick and one in Ontario.

The Hartland Bridge (click on Hartland for pictures) is the longest covered bridge in the world. The West Montrose Covered Bridge is the last wooden covered bridge in Ontario. The Marchand Covered Bridge (click Marchand for more info) is the longest covered bridge in Quebec (click Quebec for pictures).

These paintings represent an imaginary historical covered wooden bridge
somewhere in Canada.

The students worked on illustrating a rocky river shoreline lined by trees, a stone wall, a gravel road, a painted wooden bridge with light reflecting off the bridge to create reflections of the bridge and the trees in the water.


Through researching the answer it appears that the main reason was to prevent the bridges from premature rotting. Covering and roofing them protects them from the weather, and so they last longer.
Saturday, March 23, 2013
Catch a Star
Grandmaman had a wonderful morning with a group of very talented four year old artists. We began the morning with a story about a little boy who wanted very much to catch his very own star, "How to Catch a Star" by Oliver Jeffers.

 |
| Logan listens to the story and makes a plan of how to catch his very own star. |
 |
| Logan prepares his paper by choosing where to put his star stickers, pushing them on and then painting the watercolour paper with water. |
 |
| Logan's "Catch a Star"painting |
Brief steps for the project:
Tape watercolour paper to a board to create a border.
Lightly draw a horizon or beach line (curvy or straight).
Using the edge of a tealight for wax, trace over the horizon line.
Place a large star sticker where the sand will be.
Place a variety of star stickers in the sky.
(Choose a number and size of the stars to focus on.)
Using the edge of a tealight for wax, make wax streaks in the sky for shooting stars.
Paint the sky with water, then paint over with your choice of sky colours with watercolour paint (wet on wet technique).
Paint the sand area with water, then paint over with your choice of sand colours with watercolour paint (wet on wet technique). Sprinkle salt on sand.
When the painting is dry remove the star stickers and the tape.
It is January 2014 now and Sadie invited Grandmaman to her nursery school to paint stars. These little artists were three, four or five years old. Before we began our painting we read the story "How to Catch a Star" by "Oliver Jeffers" and then we sang "a twinkle song" to the tune of "Frère Jacques".
Twinkle, twinkle,
Twinkle, twinkle,
Little stars,
Little stars,
Catch me if you can,
Catch me if you can,
In the sand,
In the sand!
 |
| Sadie paints around her stars. |
 |
| Sadie proudly shows off her "Catch a Star" painting. |
 |
| Today we used larger stars with a focus on the number five. |
 |
| We talked about the different formations we could place our stars. |
   |
Oliver, at 18 months decided that he would like to create a star painting as well. He chose big stars and little stars and with a little bit of help from Grandmaman to take the backing off the stickers he placed them on the watercolour paper. Once he had placed them on the paper, Oliver had fun pushing hard on them to make sure they were well "stuck".
 (wax resist technique). 
Finally Oliver painted the whole paper with water. Once the paper was wet he painted some areas with yellow watercolour and other areas with different hues of blue(wet on wet technique)
 |
Wednesday, November 21, 2012
A Crooked Christmas Tree

This art project is a wonderful way to extend learning after reading "The Little Crooked Christmas Tree" written by Michael Cutting and illustrated by Ron Broda.
Art Project: Christmas Card
1.
Prepare watercolour paper by cutting or tearing
to size (ripple watercolour paper is a good choice). The card can either be a single sheet to be attached to a
card later on or a folded piece of watercolour paper.
2.
Tape to a board using green painter’s tape.
3.
Demonstrate each step of the activity before the
children do each step.
4. With a pencil sketch a curved line the length that you want the
tree.
5.
Give each child a length of thin green painter’s
tape. Attach small pieces of tape
to the curved line from top to bottom.
The pieces will get progressively longer. At the bottom attach a trunk.
6.
With a tealight rub a section at the bottom of
the card which will resist the paint and become snow.
7.
Put a circle sticker in the sky which will be a
full moon.
8.
With a large watercolour brush paint the entire
card with clean water. Before it
dries paint the card with the desired colour. I used blue but other colours could be used. More than one colour can be used but
choose carefully. Also if two colours
are used the children need to be extra careful not to paint, paint, paint,
paint over and over. Muddy paint can
be made this way.
9.
Sprinkle salt if desired.
10.
Let dry then take off all the tape and the
circle sticker.
Monday, September 24, 2012
Paris 2012
Voici les photos que j'ai pris et les mémoires que j'ai fait pendant mon aventure à Paris en septembre 2012 avec mon mari.
| ||

| ||

| ||

| ||

| ||

| ||

Subscribe to:
Posts (Atom)